Monday 30 April 2018

Mechanical back pain

                                         
                             Mechanical back pain is the term that refers to any type of back pain caused by placing abnormal stress and strain on muscles of the vertebral column. Typically, mechanical pain results from bad habits, such as poor posture, poorly-designed seating, and incorrect bending and lifting motions.
                                The most common type of back pain is mechanical back pain. People with mechanical back pain often describe it as “throbbing” or “aching”. They can also find that their pain gets worse with movement and gets better with rest.

COMMON FEATURES OF MECHANICAL BACK PAIN:

  •                        It can  begin at any age. Somebody having morning stiffness is lesstham 30 minutes, then it subsides. Pain often improves by rest. Variable onset, may develop quickly. Pain is usually associated with injury or strain. Pain can be described as "throbbing" or"aching" 

  • Some of Common types are,


 LUMBER STRAIN OR SPRAIN – this is usually due to muscle injuries. For example,  injuries may be a result of lifting an object awkwardly, heavy lifting or a sports injury.

HERNIATED (SLIPPED) DISC – this refers to damage or a problem with the spinal discs, the rubbery cushions that sit between the individual bones . Sometimes, the disc has moved from its usual position (slipped disc) and, as a result, causes pain because it irritates nearby nerves. This nerve pain is called neurogenic pain – another type of back pain. If the herniated disc is in the lower back,the pain can often feel worse in your leg than in your back.
VERTEBRAL FRACTURE – broken bones in your spine can be caused by hard physical impacts, such as sports injuries or car accidents. Additionally, patients can suffer from stress fractures, which are small fissures visible on X-ray that can be very painful. Vertebral fractures can also occur with a condition called osteoporosis. Osteoporosis is a condition occurring later in life where your bones weaken, resulting in a higher likelihood of fractures.
DEGENERATIVE DISC DISEASE – this is when one or more of the spinal discs begin to deteriorate. These discs act as padding when the spine moves or bears weight.
SPINAL OSTEOARTHRITIS  a degenerative disorder that is common with older age and that can cause pain and stiffness in the spine and lower back due to a breakdown of the cartilage of the joints and discs in the spine.
CONGENITAL DEFORMITY – conditions are referred to as congenital when they are present from birth. These deformities occur when the spine does not develop correctly in the womb and are rare. Some congenital deformities are mechanical causes of back pain. These deformities include things such as scoliosis (the spine is curved from side to side) and kyphosis (the top of the spine is over-curved and rounded). A congenital deformity that leads to back pain is usually diagnosed during childhood.

Tuesday 24 April 2018

PIRIFORMIS SYNDROME AND ITS PHYSIOTHERAPY REHABILITATION


Piriformis syndrome:

Piriformis syndrome otherwise known as wallet syndrome, obviously usually Piriformis syndrome starts with pain, tingling, or numbness in the buttocks. Pain can be severe and extend down the length of the sciatic nerve (called sciatica). The pain is due to the piriformis muscle compressing the sciatic nerve, such as while sitting on a car seat or running. Who is having or maintaining wrong postures they can get this Piriformis syndrome.


Causes

It is usually because of overuse obviously, which causes the pirofirmis muscle to go into spasm resulting in pressure on the sciatic nerve. The piriformis muscle is one of the small deep muscles in the buttocks that rotates the leg outwards. It runs from the sacrum bone at the bottom of the spine and attaches to the thigh bone or femur roughly near the outside crease of the buttocks. The sciatic nerve runs very close to this muscle and in around 10% of the population it actually passes straight through the muscles fibers. If the piriformis muscle becomes tight it can compress the sciatic nerve and cause pain which can radiate down the leg, commonly known as sciatic pain.

It has been suggested that this condition would be better referred to as piriformis impingement due to the impingement of the sciatic nerve. A common cause of piriformis syndrome is tight adductor muscles on the inside of the thigh. This means the abductors on the outside cannot work properly and so put more strain on the piriformis muscle.

Pathophysiology

The piriformis muscle is flat, pyramid-shaped, and oblique. This muscle originates to the anterior of the S2-S4 vertebrae, the sacrotuberous ligament, and the upper margin of the greater sciatic foramen. Passing through the greater sciatic notch, the muscle inserts on the superior surface of the greater trochanter of the femur. With the hip extended, the piriformis muscle is the primary external rotator; however, with the hip flexed, the muscle becomes a hip abductor. The piriformis muscle is innervated by branches from L5, S1, and S2. A lower lumbar radiculopathy may cause secondary irritation of the piriformis muscle, which may complicate diagnosis and hinder patient progress.
Many developmental variations of the relationship between the sciatic nerve in the pelvis and piriformis muscle have been observed.  In approximately 20% of the population, the muscle belly is split, with 1 or more parts of the sciatic nerve dividing the muscle belly itself. In 10% of the population, the tibial/peroneal divisions are not enclosed in a common sheath. Usually, the peroneal portion splits the piriformis muscle belly, although in rare cases, the tibial division does so.
Involvement of the superior gluteal nerve usually is not seen in cases of piriformis syndrome. This nerve leaves the sciatic nerve trunk and passes through the canal above the piriformis muscle.

Symptoms of Piriformis Syndrome

Most commonly, patients describe acute tenderness in the buttock and sciatica-like pain down the back of the thigh, calf and foot. Typical piriformis syndrome symptoms may include:
A dull ache in the buttock
Pain down the back of the thigh, calf and foot (sciatica)
Pain when walking up stairs or inclines
Increased pain after prolonged sitting
Reduced range of motion of the hip joint
Symptoms of piriformis syndrome often become worse after prolonged sitting, walking or running, and may feel better after lying down on the back.

What’s the Physiotherapy Treatment for Piriformis Syndrome?

After a thorough assessment of your back, pelvis and hips, your physiotherapist will determine the cause of your pain. Your physiotherapist will  tailor exercises and treatment according with your condition

Once your diagnosis is established, treatment could involve any of the following:
  • Pelvis and spine re-alignment techniques(Postural correction exercises)
  • Joint mobilisation to restore normal joint mobility, range of motion and function
  • Electrotherapy to help decrease pain and spasm in your piriformis and increase blood flow plus soft tissue extensibility.
  • Stretching program for muscle length and flexibility, mainly piriformis, hamstring and addctor muscles
  • Dry Needling to reduce muscle tightness around the buttock.
  • Deep core stability and hip strengthening exercises to stabilise your hip, pelvis and spine.
  • Foot orthotics or exercises, if indicated by your physiotherapist or podiatrist, to help restore foot and lower extremity alignment.

The therapist can also give several tips to avoid an aggravation of the symptoms. This includes:
Avoid sitting for a long period
Stand and walk every 20 minutes
Make frequent stops when driving to stand and stretch
Prevent trauma to the gluteal region
Avoid further offending activities.
Daily stretching is recommended to avoid the recurrence of the piriformis syndrome.
  • The patient can also perform several exercises and treatments at home including:
    • Rolling side to side with flexion and extension of the knees while lying on each side
    • Rotate side to side while standing with the arms relaxed for 1 minute every few hours
    • Take a warm bath
    • Lie flat on the back and raise the hips with your hands and pedal with the legs like you are riding a bicycle
    • Knee bends, with as many as 6 repetitions every few hours. So do treatment according to your physiotherapists decision, It will make you get recover soon.
Both stretching and strengthening exercises are important for treating and preventing piriformis syndrome.
Stretching exercises release spasm in the muscle and therefore pressure on the sciatic nerve whilst strengthening ensures the muscle is strong enough to cope with the demands placed on it, preventing the injury recurring. We also demonstrate below how foam roller exercises should be performed to help treat piriformis syndrome.

Stretching exercises

Due to the position of the piriformis muscle in the hip, static stretches are more appropriate. Static stretching is where the stretch is applied then held for a period of time. It is important the stretch is not forced by is applied gently. The piriformis muscle itself should be stretched on a daily basis and in the early stages at least 3 times a day may be required. In addition other stretching exercises for the groin and other buttock muscles will help ensure the joint is balanced.

Outer hip stretch -
To stretch the muscles that rotate the hip outwards. Lie on your back and bend the knee of the leg to be stretched. Use the opposite hand to pull the knee over to the side as shown opposite. You should feel this in the hip and buttocks. Hold stretch for 20 to 30 seconds, repeat 3-5 times and stretch 3 times a day.

Piriformis stretch: -
Lay on your back and bend both knees with the feet flat on the floor. Place the outer foot of the leg you wish to stretch on the lower thigh/knee of the other leg. Grip behind the thigh and pull this knee in towards your chest. You should feel a stretch in the buttock. Hold this position for 30 seconds, repeat 3-5 times and stretch 3 times a day.
Another version of this stretch can be done standing up where the knee is placed under and across the body resting on a table. The patient then leans forward using bodyweight to increase the stretch.


Long adductor stretch :-
It is important to stretch the long adductor muscles which attach at the knee as well as the short adductor muscles which attach above the knee. Long adductor muscles need to be stretched with a straight leg. This can be done either sitting or standing. Short adductor muscles are stretched with the knees bent.

Short adductor muscle stretch - Sit on the floor and put the soles of your feet together. Use your elbows to apply a gentle downward pressure to your knees to increase the stretch. You should feel a stretch on the inside of the thigh. Hold this position for 30 seconds, repeat 3-5 times and stretch 3 times a day.


Muscle energy technique :-
With a partner lie on your front and get the partner to rotate the bent leg outwards (towards the horizontal) as far as it will comfortably go. Then the athlete applies gentle pressure at about 25% effort to try and return the leg to the vertical. The partner resists this movement.
Hold this pressure for about 10 seconds and then relax. The partner then moves the leg further to stretch the muscle and holds this position for 30 seconds. Repeat this process until you get no further improvements in mobility. This is an excellent stretching method and has produced some exceptional and instantaneous results. This should only be done by trained therapists.

Foam roller exercises for piriformis syndrome

The foam roller is used to apply deep tissue myofascial release massage to the muscle. One leg is placed across the other to put the muscle on stretch. The athlete then moves over the roller in a slow and controlled manor working backwards and forwards along the length of the muscle. This may be mildly uncomfortable but should not be painful. If you are not able to perform the exercise and keep the muscle relaxed then try performing the exercise a little more lightly. The aim is to relax the muscle and if it is tightening up through pain it is not working.

Strengthening exercises

Strengthening the piriformis muscle itself and also the other hip abductor muscles can be helpful in preventing piriformis syndrome recurring.


Resistance band abduction :-
Stand with one end of the band tied around the ankle and the other end attached to a fixed object, close to the floor. Move the leg out to the side, away from the body, keeping the knee straight. Once you get as far as is comfortable, slowly return the leg back to the center. Repeat 15 times and gradually build this up to 2 sets of 20 reps.

Side lying clam exercise :-
Lay on your side with the hip to be worked on top. Bend your knees and position them forwards so that your feet are in line with your spine. Make sure your top hip is directly on top of the other and your back is straight. Keeping the ankles together, raise the top knee away from the bottom one.
Remember, don't move your back or tilt your pelvis, all the movement should be coming from the hip. Slowly return it to the starting position. Repeat 15 times initially and gradually build this up to 2 sets of 20.


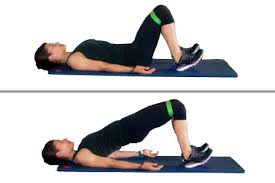
Hip extension exercise :-
Position yourself on all fours. Shift your weight slightly off the leg to be worked. Keeping the knee bent, raise the knee off the floor so that the sole of the foot moves towards the ceiling. Slowly lower the leg, almost back to the starting position and repeat. Repeat 15 times initially and gradually build this up to 2 sets of 20.

Wednesday 18 April 2018

SUBACROMIAL BURSITIS

Subacromial bursitis is a condition characterized by tissue damage and inflammation of the subacromial bursa (a small fluid filled sac located beneath the bony prominence at the top / outer aspect of the shoulder) causing pain in the shoulder


Beneath the acromion lies a bursa known as the subacromial bursa . A bursa is a small sac filled with lubricating fluid and is designed to reduce friction between adjacent soft tissue or bony layers. The subacromial bursa reduces friction between the bony prominence of the acromion (above the bursa) and the tendon of the supraspinatus muscle (which attaches to the upper aspect of the humeral head) below the bursa.

During certain activities, such as arm elevation, rotating the shoulder, lifting, pushing or pulling or lying on the shoulder, friction and compressive forces are placed on the subacromial bursa. Pressure may also be placed on the subacromial bursa following a direct impact or fall onto the point of the shoulder, elbow or outstretched hand. When these forces are excessive due to too much repetition or high force, irritation and inflammation of the bursa may occur. When this occurs, the condition is known as subacromial bursitis.

WHAT ARE THE CAUSES?
Repetitive or prolonged overhead activities
Repetitive or prolonged arm elevation activities
Repetitive or prolonged use of the arm in front of the body
Activities involving rotation of the shoulder
Lifting (especially overhead)
Excessive pushing or pulling activities (placing strain on the bursa via the supraspinatus tendon)
Putting weight through the affected arm
Lying on the affected side

Signs and symptoms of subacromial bursitis
Patients with this condition typically experience pain at the top, front, back or outer aspect of the shoulder. Pain may also radiate into the upper arm as far as the elbow. In less severe cases, patients may only experience an ache or stiffness in the shoulder that increases with rest following activities placing strain on the bursa. These activities typically include arm elevation activities, use of the arm in front of the body or overhead, shoulder rotating activities, lifting, pushing or pulling, placing weight through the arm or lying on the affected side. The pain associated with this condition may also warm up with activity in the initial stages of injury.
As the condition progresses, patients may experience symptoms that increase during activity or sport, affecting performance. Patients with subacromial bursitis may also experience pain on firmly touching the top / outer aspect of the shoulder. A painful arc of arm elevation and / or a feeling of shoulder weakness may also be present particularly when attempting to lift or elevate the arm overhead.

Prognosis of subacromial bursitis

Most patients with this condition heal well with appropriate physiotherapy and return to normal function in a number of weeks. Occasionally, rehabilitation can take significantly longer and may take many months in those who have had their condition for a long period of time, or, in those with other associated injuries such as rotator cuff pathology. Early physiotherapy treatment is vital to hasten recovery in all patients with subacromial bursitis.

Physiotherapy for subacromial bursitis

Physiotherapy treatment is vital to hasten the healing process, ensure an optimal outcome and reduce the likelihood of recurrence in all patients with this condition. Treatment may comprise:
  • soft tissue massage
  • dry needling
  • electrotherapy (e.g. ultrasound, TENS etc)
  • stretches
  • joint mobilization (of the shoulder, neck and upper back)
  • joint manipulation
  • heat or cold treatment
  • the use of a sling
  • progressive exercises to improve strength, flexibility, posture and scapula stability
  • correction of abnormal biomechanics or technique
  • education
  • postural taping
  • the use of a postural support
  • anti-inflammatory advice
  • activity modification advice
  • a gradual return to activity programme

Lying Dumbbell External Rotation

External rotations strengthen your infraspinatus and teres minor muscles. You can feel the infraspinatus if you touch the posterior, lower surface of your shoulder blade. The teres minor muscle lies on the outermost, lower border of your shoulder blade. Both muscles attach to the lateral, uppermost end of your arm bone.
This exercise is performed by holding a light dumbbell in the hand that's on the same side as your injured shoulder, then lying on the opposite side of your body. Bend your elbow to 90 degrees, draping your forearm across your abdomen; keep your injured upper arm and elbow tucked against your ribs. To work your external rotators, raise the dumbbell, rotating your arm outward as much as possible; repeat for three sets of 15 repetitions.

Lying Dumbbell Internal Rotation

This exercise engages the subscapularis muscle, which lies on the anterior surface, or underside of the scapula, and attaches to the anterior, upper end of your arm bone. First, lie flat on your back, holding a light dumbbell in the hand that's on the same side as your injured shoulder. Bend your elbow to 90 degrees, tucking your upper arm against your rib cage with your forearm rotated out to the side as much as possible. To work your internal rotator, pull the dumbbell toward you and across your abdomen; repeat for three sets of 15 repetitions.

Lateral Raises

Performing lateral raises with a very light dumbbell enables you to focus more on the supraspinatus muscle, instead of the deltoid muscle. You may do this exercise standing up or sitting down. Begin by holding the dumbbell with the hand that's on the same side as the injured shoulder. Align your entire arm along the side of your body; keep a slight bend in your elbow. Raise the dumbbell out to your side until your arm is parallel to the floor, holding the contraction for 3 seconds; repeat for three sets of 15 reps.

Saturday 14 April 2018

BENEFITS OF KINESIO TAPING

Taping is a relatively new phenomenon in athletics, but one that has started to gain mainstream popularity in recent years. In essence, taping is used to provide support or relief to injured athletes, although some also use it preventatively. Taping can be used in different ways for different issues and can achieve a variety of results. To truly understand what taping is and how it is used, it is best to first look at the history of how it was developed.

Image result for kinesio taping

Development

Taping was popularised by Dr. Kenzo Kase, who officially developed the Kinesio Taping Method in 1979. While taping was used at that point already, Dr. Kase developed several new types of tape to better aid with different issues. After finding that sports tapes at the time were too rigid, he created a new type of tape that bears far more resemblance to the texture and elasticity of human skin and muscle. This allowed users of the tape to have realistic freedom of movement and not to be constrained by their tapes.
As tapes are left on for extended periods of time, it was vital that they not only mimic human skin, but also that they stay on while still allowing the skin underneath to breathe. This was accomplished after years of development, and now the tape can be applied in many different ways and stay on for days at a time.

What Does It Do?

Kinesio tape was originally developed to speed-up the recovery-time for athletes with injured or overused muscles. Muscles lose their elasticity when they are injured or overused, and this is what can result in such long recovery times for seemingly small issues. Many treatments for injuries focus on returning the muscle to its natural shape and position, but this can restrict the movement of the injured body part, which leads to stiffness and slows down recovery time. By mimicking our muscles’ elasticity, taping can have the opposite effect and actually encourage our muscles to heal faster. It does this in a number of ways:
  • Support: Taping can be used to give support to muscles that have been injured or overused, not only relieving some of the immediate pain, but also taking stress off that muscle and allowing for faster recovery.
  • Adhesive: The adhesive for these tapes is far more complicated than the kind you would find on an everyday plaster. In order for these tapes to work as effectively as possible, it is crucial that they stay in one place. The glue used on these tapes will ensure that they do not move, will stay completely firmly on the body for days, and actually lifts up the skin underneath for breathability.
  • Healing: Other than taking stress off and relieving the pain of an injured muscle, taping is designed to encourage lymphatic flow. The lymph system is the system through which a clear liquid (lymph) flows around the body. Lymph carries white blood cells, which fight infection, but also takes care of any waste, dead cells, etc that may be found in the body. By encouraging lymphatic flow, recovery time is greatly reduced.
  • Encouraging better movement: The way we use our bodies is not always the best way to use them. For example, poor sleeping posture can lead to chronic pain. Similarly, if we learn or train to use certain body parts in certain ways, this can become constricting. Taping our bodies in a certain way can retrain them to move in ways that are more natural, easier, or safer. 
  • Training/Prevention: With the popularity of taping on the rise, many athletes have realised the potential of using tape to train. All the above benefits remain applicable, only in a way that prevents an injury rather than treating it. 
It is clear that taping provides a whole host of benefits to tackle a variety of issues faced by all athletes, so whether you're training for a marathon or recovering from an injury, taping is definitely something to consider.

Some of useful kinesio taping applications from youtube:


Wednesday 11 April 2018

GLUTEUS MEDIUS AND ITS IMPORTANCE FOR ATHLETS

While weight bearing Gluteus medius muscle acts as a pelvic stabilizer. In fact,Injuries are common amongst runners, particularly as athletes increase speeds, distances or vary training programs.
The Gluteus Medius is one of the most important, yet often forgotten muscles in preventing and rehabilitating running injuries both around the hip or further down the leg at the knee or ankle/foot. Adequate strength, activation and endurance of the Gluteus Medius muscle is required to allow optimization of biomechanics for walking, running and for reducing further injuries. So it implicates the necessities of Gluteus Medius rehabilitation after the running injuries

Gluteus Medius - Anatomy

The Gluteus Medius is of three major gluteus muscles and originates on the outer surface of the ilium (pelvis) just below the iliac crest and converges as a large flattened tendon onto the lateral greater trochanter of the femur (thigh bone).


Image result for gluteus medius


This allows the Gluteus Medius to act as a hip flexor and internal rotator (anterior) or a hip extender and external rotator (posterior) depending on what portion of the muscle is firing. When the whole muscle fires together it acts as well as a hip abductor (lifts the leg to the side) and pelvic stabilizer during weight bearing – especially running.

What Does For My Running?

In short, this means the Gluteus Medius helps to absorb ground reaction forces as the foot strikes the ground, stops an inward movement of the knee (adduction) and steadies the pelvis over the leg as you load the lower limb.
If this muscle is overloaded because it is weak or has been worked beyond its capacity, injury can occur within the Gluteus Medius muscle or it can allow load to be transmitted onto other structures, often due to a loss of good biomechanics.

Injuries Influenced By A Poorly Functioning or Overloaded Gluteus Medius

The injuries include, but are not limited to:
  • Gluteal Tendinopathy
  • Gluteal Muscle Strain or Tear
  • Patellofemoral Joint Pain Syndrome / Anterior Knee Pain
  • ITB Friction Syndrome
  • Achilles Tendinopathy
  • Hamstring Injuries
  • Hip and Knee Osteoarthritis
  • Piriformis Syndrome
  • Trochanteric Bursitis

Risk Factors for Gluteus Medius Overload

  • Female
  • Previous Injury to hip and its surrounding musculature
  • Sudden increase in training load – speed, distance, frequency
  • Change in running surfaces or running shoes
  • High impact sports or fast change of direction in sports
  • Repetitive loading in sports such as running
  • Poor static posture
  • Poor trunk and lumbar control

Rehabilitation and Prevention Exercises for Your Gluteus Medius Injury

Correct rehabilitation of your injury is essential for a successful return to sport with a minimal risk of re-injury.

Your physiotherapist will safely guide you through your rehabilitation program depending on the type and severity of injury, biomechanics, other preexisting injuries and the sport you participate in and will return back to.
Research shows that integration of trunk and lumbar stability exercises can further reduce loading onto and requirements of the Gluteus Medius. A progressive return to running and sport program will be developed as a part of your rehabilitation program.
If you have an injury it is crucial that you have a proper diagnosis and rehabilitation program from your physiotherapist but below you can find some exercises to help activate and strengthen your Gluteus Medius muscle and reduce your risk of future related running injuries.

Exercises & Videos to Help You Prevent Gluteus Medius Overload

I’d recommend the following exercises.


Image result for bridges with therabandBridges with theraband :

Loop a medium band around knees with feet shoulder width apart. LIft rear off mat while pushing knees outward toward band. Hold and slowly return.

Ball at the wall squat: By placing an exercise ball between you and a wall, a standard squat position becomes a wall squat. Wall squats focus on working the lower body and are great for working the quadriceps (front of the legs) and the butt.

Image result for wall squat with ball


Crab walk: 

Begin by sitting on the floor with your feet hip-distance apart in front of you and your arms behind your back with fingers facing hips. Lift hips off the floor and tighten your abs. Start “walking” forward by moving your left hand followed by your right foot; and then your right hand followed by your left foot. Walk four or more steps as space allows, then walk back. Continue back and forth for desired amount of time

Monster walk


Image result for monster walk