Sunday, 8 April 2018

USEFUL EXERCISES FOR BICEPS TENDINITIS

Biceps tendinitis is inflammation of the tendon around the long head of the biceps muscle. Biceps tendinosis is caused by degeneration of the tendon from athletics requiring overhead motion or from the normal aging process..


You may do these exercises right away. If any exercise increases your pain, stop doing it. Avoid overhead lifting while your tendon is healing. Some of most useful and valuable exercises to get recovery in biceps tendinitis are

  • Active elbow flexion and extension: Gently bring the palm of the hand on your injured side up toward your shoulder, bending your elbow as much as you can. Then straighten your elbow as far as you can. Repeat 15 times. Do 2 sets of 15.


  • Biceps stretch: Stand facing a wall (about 6 inches, or 15 centimeters, away from the wall). Raise your injured arm out to your side and place the thumb side of your hand against the wall (palm down). Keep your arm straight. Rotate your body in the opposite direction of the raised arm until you feel a stretch in your biceps. Hold 15 seconds. Repeat 3 times.
  • Biceps curl: Stand and hold a 5- to 8-pound weight in your hand. If you do not have a weight, use a soup can or hammer. Bend your elbow and bring your hand (palm up) toward your shoulder. Hold 5 seconds. Slowly straighten your arm and return to your starting position. Do 2 sets of 8 to 12.
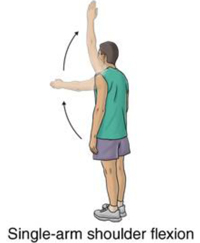
  • Single-arm shoulder flexion: Stand with your injured arm hanging down at your side. Keeping your arm straight, bring your arm forward and up toward the ceiling. Hold this position for 5 seconds. Do 2 sets of 8 to 12. As this exercise becomes easier, add a weight.
  • Resisted shoulder internal rotation: Stand sideways next to a door with your injured arm closest to the door. Tie a knot in the end of the tubing and shut the knot in the door at waist level. Hold the other end of the tubing with the hand of your injured arm. Bend the elbow of your injured arm 90 degrees. Keeping your elbow in at your side, rotate your forearm across your body and then slowly back to the starting position. Make sure you keep your forearm parallel to the floor. Do 2 sets of 8 to 12.
  • Resisted shoulder external rotation: Stand sideways next to a door with your injured arm farther from the door. Tie a knot in the end of the tubing and shut the knot in the door at waist level. Hold the other end of the tubing with the hand of your injured arm. Rest the hand of your injured arm across your stomach. Keeping your elbow in at your side, rotate your arm outward and away from your waist. Slowly return your arm to the starting position. Make sure you keep your elbow bent 90 degrees and your forearm parallel to the floor. Repeat 10 times. Build up to 2 sets of 15.
  • Side-lying external rotation: 
    Lie on your uninjured side with your injured arm at your side and your elbow bent 90 degrees. Keeping your elbow against your side, raise your forearm toward the ceiling and hold for 2 seconds. Slowly lower your arm. Do 2 sets of 15. You can start doing this exercise holding a soup can or light weight and gradually increase the weight as long as there is no pain.
  • Sleeper stretch: 
    Lie on your injured side with your hips and knees flexed and your arm straight out in front of you. Bend the elbow on your injured side to a right angle so that your fingers are pointing toward the ceiling. Then use your other hand to gently push your arm down toward the floor. Keep your shoulder blades lightly squeezed together as you do this exercise. Hold the stretch for 30 seconds. Repeat 3 times.
Biceps exercises video


Thursday, 5 April 2018

CERVICAL RADICULOPATHY

Radiculopathy can be quite painful. The condition is commonly referred to as a pinched nerve, with pain, weakness or numbness spreading down the arm.The term radiculopathy comes from radix = “root”, with the nerve root being the common site of nerve pinching. Because this compression, you can feel the pain through the nerve pathway according to the nerve roots involved.


Causes:

A radiculopathy generally occurs with irritation of the nerve root as it exits the spinal column. This irritation can be due to a number of reasons including:

  • physical compression of the nerve from a bulging disc or bony growth (osteophyte) at the edge of the vertebra, tumour, fracture . etc
  • chemical irritation from swelling around the nerve root .

Symptoms of a Cervical Radiculopathy:

Pain is the most common symptom, with the worst pain often being felt further away down the arm.
Commonly  pain referral patterns in accordance with compression of nerves at different levels of the cervical spine.
Compression of the nerve may also lead to impaired nerve function, meaning that you made have areas of reduced sensation in the arm, or reduced power in muscles supplied by the compressed nerve.

Diagnosis:

Your physiotherapist is skilled at determining which structures may be causing your neck and arm pain. There are certain questions that they may ask you to help narrow down the diagnosis and this helps to guide a hands-on assessment. Your physio will palpate the muscles and joints around your neck, as well as perform testing of the nerves.If further investigation is required an MRI is the best way to diagnose a cervical radiculopathy, however, a CT scan or X-ray can still help with diagnosis.

Cervical Radiculopathy Treatment:

Pain Relief. Minimise Swelling & Injury Protection ( Phase 1)

Managing your pain. Pain is the main reason that you seek treatment for this condition.
Managing your inflammation. Inflammation it best eased via ice therapy and techniques or exercises that deload the inflammed structures.
Your physiotherapist will use an array of treatment tools to reduce your pain and inflammation. These include: ice, electrotherapy, soft tissue massage, joint mobility techniques and use of taping techniques or an arm sling to off-load the injured structures.

Restoring Normal ROM & Posture (Phase II)

Once  your pain and inflammation settles, your physiotherapist will turn their attention to restoring your normal joint range of motion (ROM), muscle length, neural tissue mobility and resting muscle tension.
Treatment may include joint mobilisation and alignment techniques, massage, muscle stretches and neurodynamic exercises, plus acupuncture, trigger point therapy or dry needling. Your physiotherapist is an expert in the techniques that will work best for you.

Restore Normal Muscle Control & Strength (PHASE III)

Your physiotherapist will assess your muscle recruitment pattern and prescribe the best exercises for you specific to your needs.
Physiotherapists has developed their own rehabilitation programme to assist their patients to regain normal muscle control of the neck and shoulders. Please ask your physio for their advice.

Restoring Full Function (PHASE IV)

During this stage of your rehabilitation is aimed at returning you to your desired activities. Everyone has different demands for their bodies that will determine what specific treatment goals you need to achieve. For some, it may simply be to walk around the block. Others may wish to do boxing classes or return to a labour-intensive work.

Your physiotherapist will tailor your rehabilitation to help you achieve your own functional goals.

Preventing a Recurrence (PHASE V )

Injury and the pain associated does have a tendency to return. The main reason it is thought to recur is due to insufficient rehabilitation.Your physiotherapist is an expert at identifying underlying joint restrictions and poor muscle patterning, and can help you to work on these to prevent recurrence.

Expecting Results :

Disc and nerve injuries can take a while to recover as the blood flow to these structures can be poor, meaning healing takes longer. Generally, an acute radiculopathy will feel much better in one to two weeks, with resolution by three months. Some cases will take longer, with slower improvements for up to six to twelve months.

Monday, 2 April 2018

FITNESS PROGRAMME FOR YOUR HEALTHY LIFE

Starting a fitness program may be one of the best things you can do for your health. Physical activity can reduce your risk of chronic disease, improve your balance and coordination, help you lose weight — and even improve your sleep habits and self-esteem. And there's more good news. You can start a fitness program by using following steps steps.


1. Assess your fitness level

To assess your aerobic and muscular fitness, flexibility, and body composition, consider recording:
  • Your pulse rate before and immediately after walking 1 mile (1.6 kilometers)
  • How long it takes to walk 1 mile or 400 meters, or how long it takes to run 1.5 miles (2.41 kilometers)
  • How many half situps, standard pushups or modified pushups you can do at a time
  • How far you can reach forward while seated on the floor with your legs in front of you
  • Your waist circumference, just above your hipbones
  • Your body mass index

2. Design your fitness program

  • Consider your fitness goals. Are you starting a fitness program to help lose weight? Or do you have another motivation, such as preparing for a marathon? Having clear goals can help you gauge your progress and stay motivated. 
  • Create a balanced routine.
    The Department of Health and Human Services recommends getting at least 150 minutes of moderate aerobic activity or 75 minutes of vigorous aerobic activity a week, or a combination of moderate and vigorous activity.
    For example, try to get about 30 minutes of aerobic exercise on most days of the week. Also aim to incorporate strength training of all the major muscle groups into a fitness routine at least two days a week.
  • Start low and progress slowly. If you're just beginning to exercise, start cautiously and progress slowly. If you have an injury or a medical condition, consult your doctor or an exercise therapist for help designing a fitness program that gradually improves your range of motion, strength and endurance.
  • Build activity into your daily routine. Finding time to exercise can be a challenge. To make it easier, schedule time to exercise as you would any other appointment. Plan to watch your favorite show while walking on the treadmill, read while riding a stationary bike, or take a break to go on a walk at work.
  • Plan to include different activities. Different activities (cross-training) can keep exercise boredom at bay. Cross-training using low-impact forms of activity, such as biking or water exercise, also reduces your chances of injuring or overusing one specific muscle or joint. Plan to alternate among activities that emphasize different parts of your body, such as walking, swimming and strength training.
  • Allow time for recovery. Many people start exercising with frenzied zeal — working out too long or too intensely — and give up when their muscles and joints become sore or injured. Plan time between sessions for your body to rest and recover.
  • Put it on paper. A written plan may encourage you to stay on track.                          

  • 3. Assemble your equipment

  • You'll probably start with athletic shoes. Be sure to pick shoes designed for the activity you have in mind. For example, running shoes are lighter in weight than cross-training shoes, which are more supportive.
    If you're planning to invest in exercise equipment, choose something that's practical, enjoyable and easy to use. You may want to try out certain types of equipment at a fitness center before investing in your own equipment.

    4. Get started

    Now you're ready for action. As you begin your fitness program, keep these tips in mind:
    • Start slowly and build up gradually. Give yourself plenty of time to warm up and cool down with easy walking or gentle stretching. Then speed up to a pace you can continue for five to 10 minutes without getting overly tired. As your stamina improves, gradually increase the amount of time you exercise. Work your way up to 30 to 60 minutes of exercise most days of the week.
    • Break things up if you have to. You don't have to do all your exercise at one time, so you can weave in activity throughout your day. Shorter but more-frequent sessions have aerobic benefits, too. Exercising in 10-minute sessions three times a day may fit into your schedule better than a single 30-minute session.
    • Be creative. Maybe your workout routine includes various activities, such as walking, bicycling or rowing. But don't stop there. Take a weekend hike with your family or spend an evening ballroom dancing. Find activities you enjoy to add to your fitness routine.
    • Listen to your body. If you feel pain, shortness of breath, dizziness or nausea, take a break. You may be pushing yourself too hard.
    • Be flexible. If you're not feeling good, give yourself permission to take a day or two off.

    5. Monitor your progress

    Retake your personal fitness assessment six weeks after you start your program and then again every few months. You may notice that you need to increase the amount of time you exercise in order to continue improving. Or you may be pleasantly surprised to find that you're exercising just the right amount to meet your fitness goals.
    If you lose motivation, set new goals or try a new activity. Exercising with a friend or taking a class at a fitness center may help, too.
    Starting an exercise program is an important decision. But it doesn't have to be an overwhelming one. By planning carefully and pacing yourself, you can establish a healthy habit that lasts a lifetime.

Friday, 30 March 2018

WARM UP EXERCISES FOR YOUR WINTER WORK OUT

warm up generally consists of a gradual increase in intensity in physical activity , joint mobility exercise, and stretching, followed by the activity. Warming up brings the body to a condition at which it safely responds to nerve signals for quick and efficient action. 

Image result for warm up exercises

Warm up exercises are needed regardless of the type of workout you choose. The warm up exercises will prevent sprains and strains. In winter, you need to increase the amount of time you spend on warm up exercises. This is due to the reduced temperatures and the fact that the muscles are tighter in the winter, so injuries are more common. There are a few warm up exercises you can choose from.
1. Static Stretches
When you are planning to walk or jog outside in the winter, it's imperative that you perform your leg, arm and back stretches. Take some extra time to stretch your entire body (i.e. 10 minutes). Don't forget to stretch the hamstrings, the quadriceps and the Achilles' tendon.
2. Arm Circles
Arm circles can be performed as warm up exercises if you are planning to ski or bike. Circle your arms from one side to the other, making sure to increase the tempo. You may also take some deep breaths raising your hands up in the air. When you exhale, bend over and quickly move your hands towards the ground.
3. Twist Your Upper Body
To stretch your upper body, place your hands on your hips and move your upper body from left to right, then from right to left. Try rotating your upper body clockwise and then counterclockwise.

4. Jumping Jacks
Jumping jacks can increase your heart rate, but make sure you perform a few stretching moves prior to these. The jumping jacks will ensure that the heart will start pumping more blood to the muscles, so that you won't be prone to injuries.
5. Walking
Prior to a longer run, you can take 5 minutes to walk and put your blood into motion. You can also perform the hands and upper body stretches while you walk.
6. Squats
Squats will work on your lower body and will warm up the muscles from this area. Make sure you perform the squats correctly. Hold your hands in front of you or put them at the back of your head; your back should be straight. Use your abdominal muscles to squat down and come back up. Try not to move your hands and upper body while you perform the squats.
7. Jumping Rope
Jumping rope is not a usual way to warm up, but it may be used if you prefer a more intensive type of warm up. This warm up exercise will increase your heart rate.
Unlike the other types of warm up exercises, jumping rope is only required for 3 to 5 minutes to prepare you for your winter workout. Ideally, you should perform this activity after stretching for a couple of minutes.

8. Imitate the Exercise Moves
You may also warm up by imitating the moves you are about to perform during your workout. In this manner, you will warm up the muscle groups that you will be using.
These are some of advisable warm exercises for your winter season. so do your workout with proper warm up exercises and keep fit your body....

Tuesday, 27 March 2018

IMPORTANCE OF COOL DOWN EXERCISES AFTER WORK OUT

The importance of a cool down immediately after a workout cannot be emphasized enough. After running, jumping or throwing, it is always a good idea to do some cool down excercises immediately. This will help to prevent any injuries or unnecessary soreness. Start with a light jog around the track and make sure to go at a slow pace. This will prevent your muscles from tightening up and becoming sore. Also, sprinting is an anaerobic excercise which builds up lactic acid. A slow jog will help to get  rid of the acid from the body. Do at least 2 laps after a work out and stretch again. It is important to get a good stretch on the quads, hamstrings, and calves which will be worked out the hardest.


Many people dismiss the cool down as a waste of time, or simply unimportant. In reality the cool down is just as important as the warm up, and if you want to stay injury free, it’s vital. It is necessary to take the tissues normal level


Purpose:


The main aim of the cool down is to promote recovery and return the body to a pre exercise, or pre work out level. During a strenuous work out your body goes through a number of stressful processes. Muscle fibers, tendons and ligaments get damaged, and waste products build up within your body. Lactic acid also present in the muscle fibres.
The cool down, performed properly, will assist your body in its repair process. One area the cool down will help with is relieving some of the effects of delayed-onset muscle soreness or DOMS. This soreness is caused by a number of things. Firstly, during exercise, tiny tears called micro tears develop within the muscle fibers. These micro tears cause swelling of the muscle tissues which in turn puts pressure on the nerve endings and results in pain. DOMS may occur due to dehydration also. Whatever the reason cool down activities help to reduce the occurrence of DOMS.
Secondly, when exercising, your heart is pumping large amount of blood to the working muscles. This blood is carrying both oxygen and nutrients that the working muscles need. When the blood reaches the muscles the oxygen and nutrients are used up. Then the force of the contracting (exercising) muscles pushes the blood back to the heart where it is re-oxygenated. It helps to reduce heart rate in normal way.
However, when the exercise stops, so does the force that pushes the blood back to the heart. This blood, as well as waste products like lactic acid, stays in the muscles, which in turn causes swelling and pain. This process is often referred to as “blood pooling.”
So, the cool down helps all this by keeping the blood circulating, which in turn helps to prevent blood pooling and also removes waste products from the muscles. This circulating blood also brings with it the oxygen and nutrients needed by the muscles, tendons and ligaments for repair.


So don't skip cool down activities while playing or doing work out. 

Key points for effective cool down


                     Gentle exercise and movement;

                     Low-intensity, long-hold static stretching; 

                     Re-fuel. 


Cool down routines:

             
                                         For the Professional
10 to 15 minutes of easy exercise. Be sure that the easy exercise resembles the type of exercise that was done during your work out. For example, if your workout involved a lot of running, cool down with easy jogging or walking. Include some deep breathing as part of your easy exercise to help oxygenate your system.
Follow with about 20 to 30 minutes of low-intensity, long-hold (30 to 60 seconds) static stretching. Many people make the mistake of stretching too hard or too vigorously during this part of the cool down. it is to gently lengthen out those muscles that have been constantly contracting during your game.
Re-fuel. This part of the cool down can be done as you perform the other two parts. Both fluid and food are important. Drink plenty of water, plus a good quality sports drink. The best type of food to eat straight after a work out is that which is easily digestible. Fruit is a good example. 

                                            For the Amateur
3 to 5 minutes of easy exercise. Be sure that the easy exercise resembles the type of exercise that was done during your work out. For example, if your workout involved a lot of running, cool down with easy jogging or walking. Include some deep breathing as part of your easy exercise to help oxygenate your system.
Follow with about 5 to 10 minutes of low-intensity, long-hold (30 to 60 seconds) static stretching. 
Re-fuel. This part of the cool down can be done as you perform the other two parts. Both fluid and food are important. Drink plenty of water, plus a good quality sport